
City life means you want security and savings without complicated installs or expensive help. Choosing the right motion sensor light can help protect your entryways, garages, and hallways while saving energy and lowering costs. With features like adjustable sensitivity and wide detection angles, you can select a model that fits your needs and install it without electrical expertise. Discover how to boost home safety and enjoy smart convenience with easy-to-use motion sensor lighting.
| Essential Insight | Detailed Explanation |
|---|---|
| 1. Choose suitable sensor features | Select motion sensor lights with a wide detection angle and weather resistance suited for your specific environment. |
| 2. Proper installation is crucial | Ensure to use the correct tools and follow safety measures for a successful setup and to avoid electrical hazards. |
| 3. Test thoroughly post-installation | Conduct tests under various conditions to verify movement detection and sensitivity settings to ensure reliable operation. |
| 4. Adjust settings for performance | Customize sensitivity and timer settings to minimize false triggers while optimizing security and energy use. |
| 5. Avoid common installation errors | Understand issues like false triggers or limited coverage and know how to adjust positioning and wiring for solutions. |
Selecting the perfect motion sensor light requires strategic thinking about your specific space and security needs. Understanding the nuanced features will help you make an informed decision that enhances both safety and convenience.
When choosing a motion sensor light, consider these critical factors:
Different spaces demand different motion sensor specifications. Outdoor porch lights need weather-resistant models with longer detection ranges, while indoor hallway lights require more subtle, shorter-range sensors. Consider the specific environment where you’ll install the light.
Here’s a quick comparison of suitable motion sensor light types for different areas of your home:
| Location | Ideal Sensor Type | Recommended Features | Security Impact |
|---|---|---|---|
| Outdoor Porch | Weather-resistant, long range | High IP rating, wide detection angle | Deters intruders, lights large area |
| Indoor Entryway | Short range, adjustable | Sensitivity controls, low profile | Prevents false alarms, convenient access |
| Garage/Driveway | Solar or hardwired, robust | Strong mounting, extended coverage | Illuminates approach, safe vehicle parking |
| Hallway/Staircase | Subtle, quick response | Fast activation, compact design | Prevents accidents, saves energy |
Not all motion sensor lights are created equal. Your choice impacts home security, energy efficiency, and overall convenience.
Pro tip: Test your motion sensor light during different times of day and in various weather conditions to ensure optimal performance and reliability.
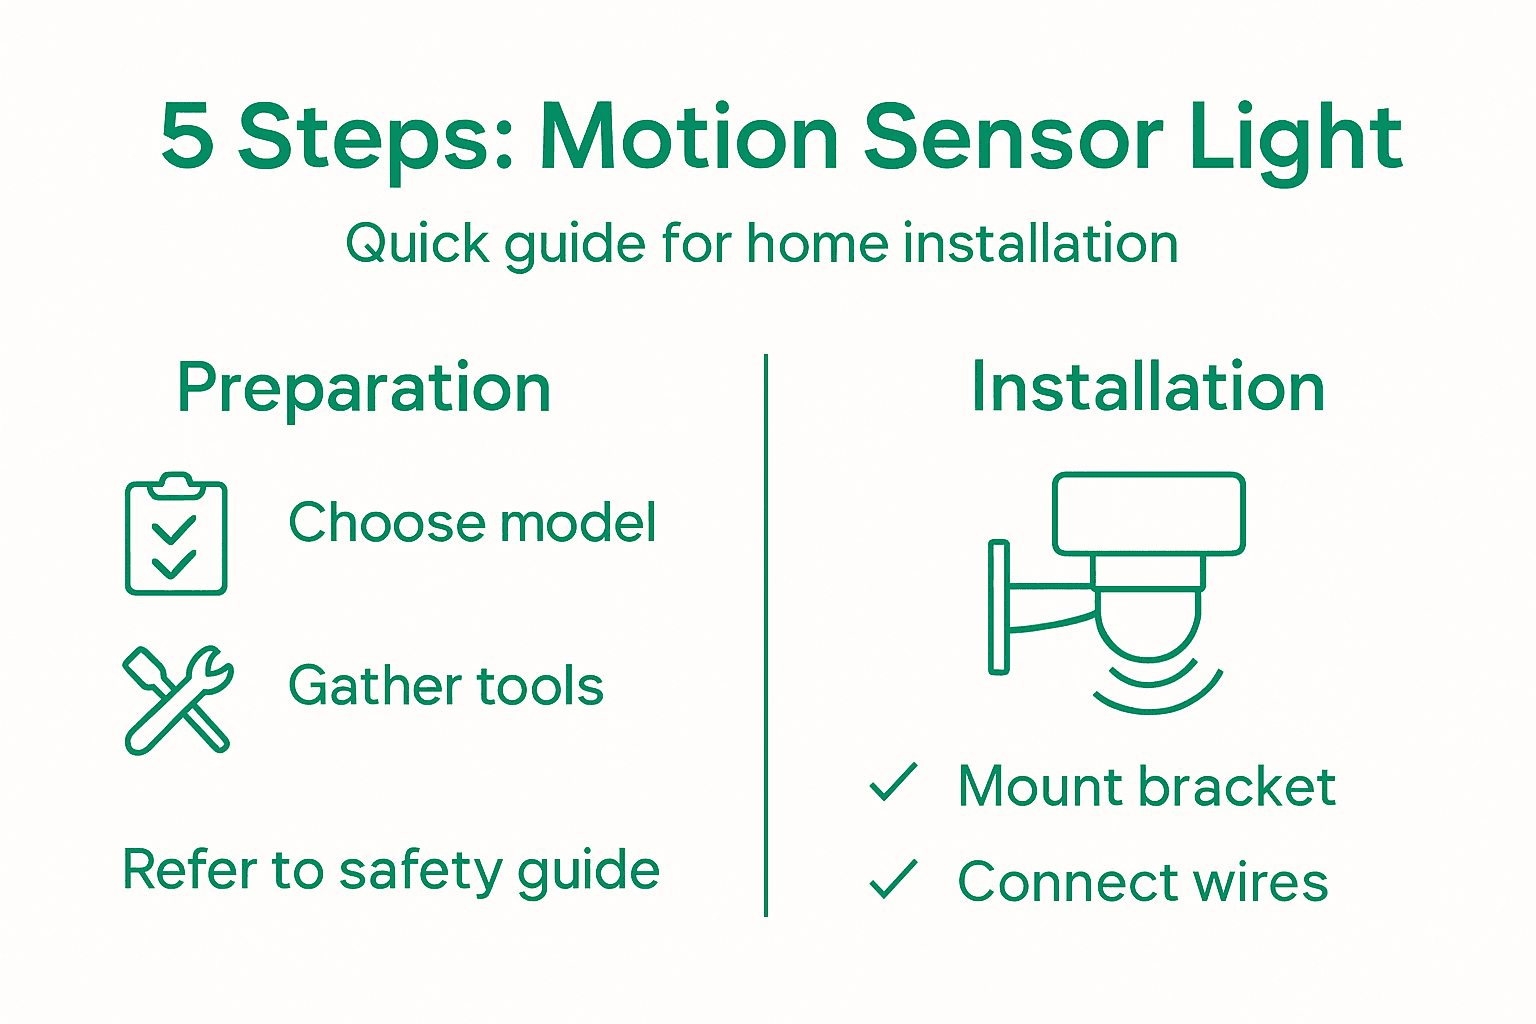
Before diving into your motion sensor light installation, you’ll need to set the stage for a smooth and safe setup. Proper preparation can make the difference between a frustrating experience and a professional-looking result.
Start by gathering all necessary tools and materials, focusing on essential installation equipment. Your toolkit should include:
Choosing the right installation location is crucial. Look for spots with clear visibility, minimal obstructions, and stable mounting surfaces. Electrical safety is paramount - always turn off power at the circuit breaker before beginning any electrical work.
Safety first: A few minutes of careful preparation can prevent hours of potential troubleshooting and costly mistakes.
Pro tip: Take a smartphone photo of your existing electrical setup before disconnecting anything, which can serve as a helpful reference during reinstallation.
Now that you’ve prepared your tools and workspace, it’s time to install your motion sensor light in a way that maximizes both functionality and security. Strategic mounting is crucial for optimal performance.
Follow these essential steps for secure mounting:
Be mindful of potential false trigger zones. Avoid pointing the sensor directly toward heat sources like air conditioning units or areas with frequent wind movement. The goal is creating a clear, unobstructed detection path that captures movement without unnecessary activations.
Precision in mounting can make the difference between an effective security solution and a frustrating, unreliable system.
Carefully attach the mounting bracket using the provided hardware, ensuring it’s level and securely fastened. Double-check that the bracket can support the light fixture’s weight and will maintain its position over time.
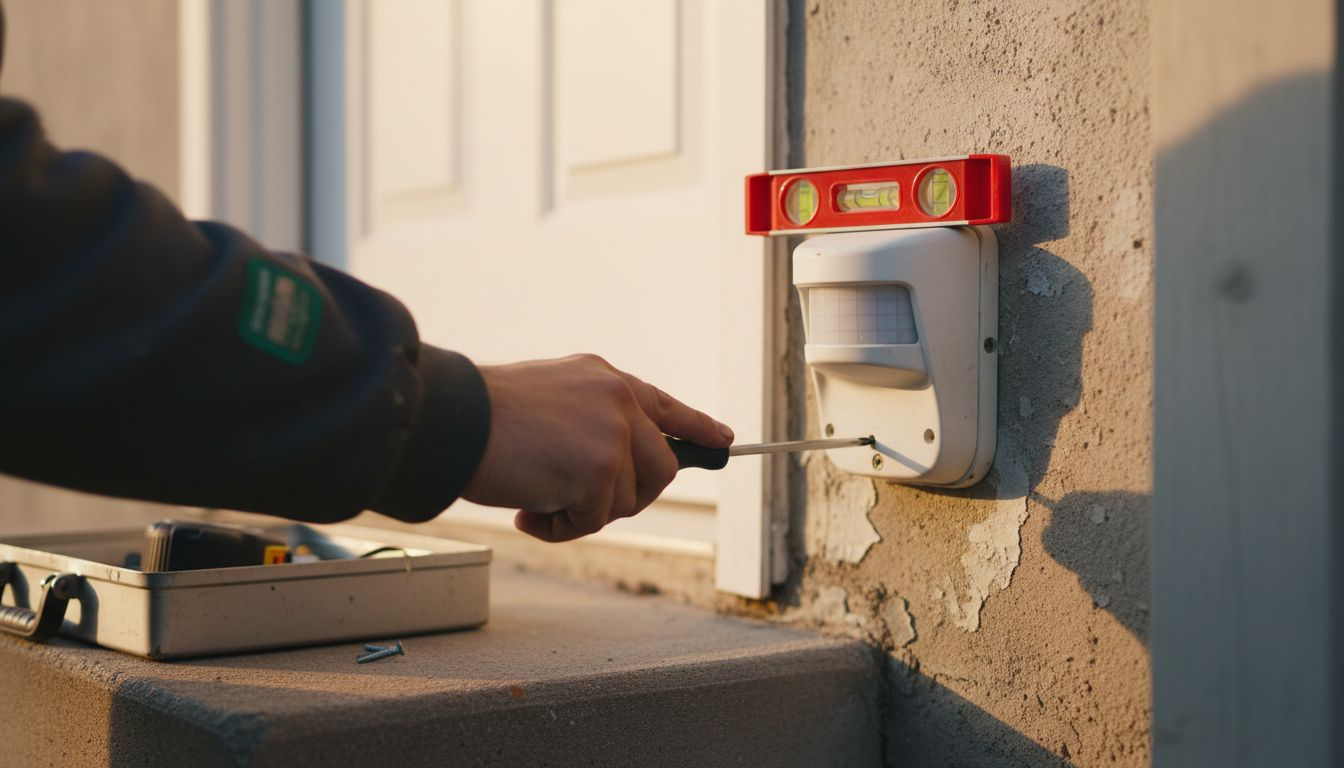
Pro tip: Use a small level during installation to ensure your motion sensor light is perfectly aligned, preventing unintended blind spots in your security coverage.
With your motion sensor light mounted securely, it’s time to bring it to life by connecting electrical components safely and configuring its intelligent features.
Follow these critical wiring and configuration steps:
Once wired, you’ll want to customize your motion sensor light’s settings. Adjust sensitivity to prevent false triggers from small animals or moving branches. Set the timer duration to control how long the light stays on after detecting motion, balancing security and energy efficiency.
Precise configuration transforms a simple light into a smart security solution.
Most motion sensor lights offer nuanced settings like ambient light thresholds, which prevent daytime activation and unnecessary power consumption. Take time to understand your specific model’s configuration options.
Pro tip: Test your motion sensor light’s settings at different times of day, simulating various movement scenarios to fine-tune its performance.
After installation, your next critical task is thoroughly validating the motion sensor light’s performance.
Conduct a comprehensive walk test to ensure optimal functionality:
Systematic testing involves moving at different angles, speeds, and distances within the sensor’s range. Pay close attention to how quickly the light responds and whether it remains illuminated for the programmed duration. Look for any unexpected behaviors like premature shutoff or delayed activation.
Review this summary of common installation errors and their solutions to ensure a smooth setup:
| Common Error | Cause | Recommended Solution |
|---|---|---|
| Frequent false triggers | Sensor facing heat source or traffic | Adjust positioning and sensitivity |
| Light not turning on | Loose or incorrect wiring | Double-check and secure connections |
| Limited detection coverage | Installed too low or obstructed | Raise height, clear sensor’s path |
| Sensor activates during day | Ambient light threshold not set | Reconfigure light sensitivity |
A thorough test now prevents potential security gaps later.
Consider testing during daytime and nighttime to understand how ambient light affects sensor performance. If you notice inconsistent triggers, you might need to readjust the sensor’s angle or sensitivity settings.
Pro tip: Use a family member or friend to help test the sensor’s coverage area, providing an extra set of eyes to spot potential blind spots or irregular detection patterns.
Struggling with complicated wiring and unreliable motion sensor lights is a common challenge in home automation projects. This article highlights key steps like selecting the right sensor, mounting securely, and adjusting settings to avoid false triggers and ensure safety. If you want to skip the hassle and still enjoy superior convenience and energy savings, explore our Smart Motion Sensor Lights Collection specially designed for easy installation without electrical expertise. These wireless, rechargeable lights come with smart features like daylight detection and adjustable sensitivity that match everything you learned about in the installation guide.
Take control of your home lighting today by choosing solutions that prioritize safety, energy efficiency, and hassle-free setup. Visit https://tryilluminate.co to discover innovative lighting upgrades trusted by customers for hallways, porches, garages, and more. For a curated selection of our most popular smart lighting products, check out the Best Sellers and experience how simple smart lighting can transform your space.
Selecting the right motion sensor light involves considering your space and specific needs. Evaluate the detection range, environmental durability, and sensitivity settings that best fit your home.
You will need tools such as a voltage tester, screwdrivers, wire strippers, a drill, and electrical tape to install motion sensor lights effectively. Gather these items before starting to ensure a smooth installation.
Install motion sensor lights 6 to 10 feet above ground level for the best detection range and effectiveness. Proper height ensures ideal coverage of your desired area and minimizes false triggers.
Turn off the circuit breaker, then connect the black (live), white (neutral), and green/bare (ground) wires securely. Use wire nuts for connections and wrap them with electrical tape for added safety.
Conduct a walk test to verify that the motion sensor light detects movement correctly. Move through the entire detection zone, checking the light’s response time and duration to ensure it functions well.
If your motion sensor light turns on during daylight, adjust the ambient light sensitivity settings. Ensure that the sensor is configured to avoid activation in bright conditions, minimizing unnecessary power usage.
Role of Rechargeable Lights – Enhancing Home Safety and Ambiance
Role of rechargeable lights in smart homes: Explore types, how they work, real uses, energy savings, safety, and common pitfalls for homeowners globally.
Read more
Role of Smart Lighting – How It Transforms Home Living
Explore the role of smart lighting in home automation, energy-saving technology, ease of installation, and enhancing daily safety and ambiance.
Read more