Rising electricity costs have led over 50 percent of American households to seek smarter, energy-saving lighting upgrades that do not require complex wiring. Whether you live in an urban apartment or a countryside home, balancing advanced control with easy DIY installation matters more than ever. This guide uncovers how affordable wireless lighting solutions empower tech-savvy homeowners worldwide to achieve both efficient performance and modern style, all without the headaches of traditional electrical renovations.
| Key Point | Explanation |
|---|---|
| 1. Assess lighting needs room-by-room | Evaluate each room’s size, natural light, and activities to identify lighting challenges. |
| 2. Choose compatible wireless products | Select lighting that supports your current smart home protocols for seamless integration. |
| 3. Prepare surfaces for installation | Ensure mounting surfaces are clean and structural integrity is verified to support fixtures. |
| 4. Optimize placement for signals | Position fixtures to avoid interference and maximize the strength of wireless communication. |
| 5. Monitor energy usage effectively | Use your system’s dashboard to track and fine-tune automation settings for energy efficiency. |
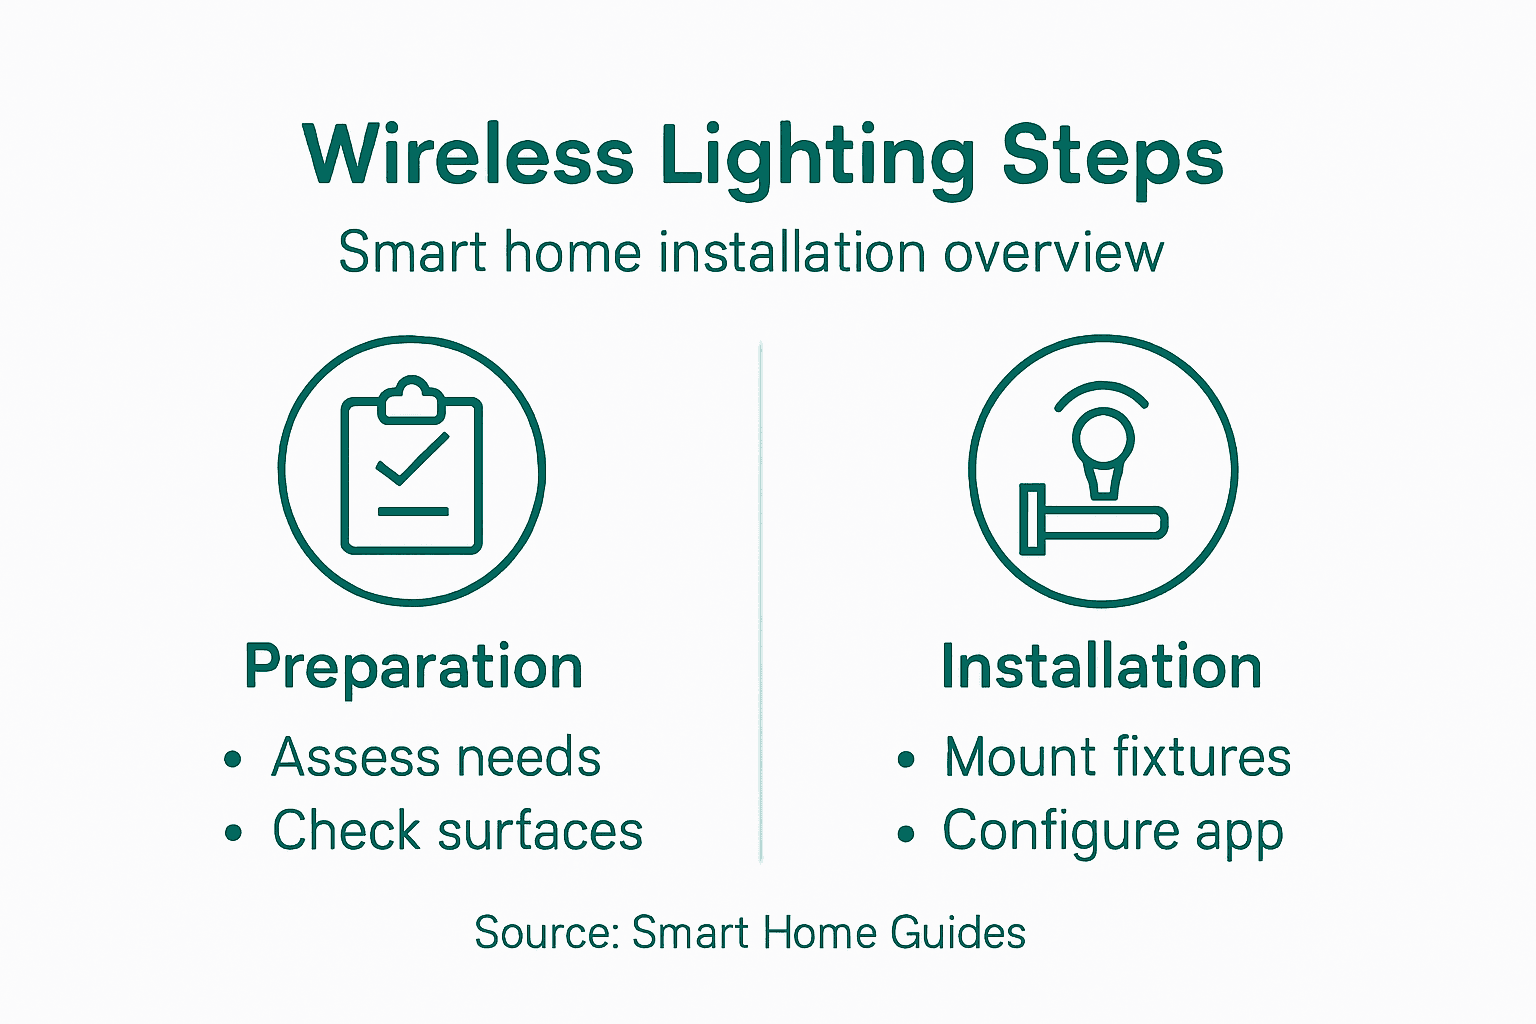
Choosing the right wireless lighting solution starts with carefully evaluating your home’s unique spatial requirements and illumination goals. Understanding how lighting controls optimize energy usage means conducting a systematic room-by-room assessment that considers functionality, aesthetics, and smart home integration.
Begin by walking through each room and noting specific lighting challenges and opportunities. Consider factors like room size, natural light availability, primary activities performed in the space, and existing electrical infrastructure. Pay special attention to areas requiring task lighting (kitchen counters), accent lighting (artwork displays), or safety illumination (hallways and staircases). Measure room dimensions and identify potential mounting locations for wireless fixtures that maximize coverage and minimize shadows.
For smart home enthusiasts, compatibility becomes crucial. Evaluate your home’s wireless network strength and determine which rooms have consistent signal coverage for reliable device connectivity. Smart home technology allows remote lighting control based on occupancy, schedules, and ambient conditions, so consider how these features align with your lifestyle and specific spatial needs.
Pro tip: Create a simple room-by-room lighting diagram that maps out potential wireless fixture placements and anticipated connectivity requirements before purchasing any equipment.
Selecting the right wireless lighting products requires a strategic approach that balances technical compatibility, functionality, and your specific home automation goals. Wireless lighting standards support diverse ecosystems through advanced protocols like Bluetooth Mesh and Zigbee, enabling seamless integration across different smart home platforms.
Start by examining your existing smart home infrastructure and identifying communication protocols already in use. Look for wireless lighting products that support multiple connectivity standards to ensure maximum flexibility. Pay close attention to key compatibility factors including wireless frequency bands, communication protocols, and potential integration with your current smart home hub or control system. Check specific technical specifications such as voltage requirements, lumens output, color temperature range, and wireless signal strength to guarantee optimal performance in your designated spaces.
Prioritize products that offer networked lighting controls supporting energy efficiency and centralized management. This approach allows you to create sophisticated lighting scenes, automate energy consumption, and customize illumination based on time of day, occupancy, or specific activity requirements. Verify that potential wireless lighting solutions provide robust mobile app controls, support voice assistant integration, and offer straightforward installation processes that match your technical comfort level.
Pro tip: Create a compatibility checklist before purchasing wireless lighting products that includes your home network type, existing smart home devices, and specific room requirements to streamline your selection process.
Here’s a quick comparison of popular wireless lighting communication protocols and their unique advantages:
| Protocol | Typical Use Case | Key Advantages |
|---|---|---|
| Zigbee | Whole-home automation | Mesh network reliability |
| Bluetooth Mesh | Room-based smart lighting | Simple setup, good scalability |
| Wi-Fi | Integration with IoT | Broad compatibility, remote access |
| Z-Wave | Smart home integration | Low interference, energy efficient |
Preparing your space for wireless lighting installation requires careful planning and systematic surface evaluation. Proper lighting installation demands electrical safety considerations that go beyond simply mounting fixtures, focusing on creating a secure and reliable electrical environment for your smart home upgrade.
Begin by conducting a comprehensive assessment of your installation surfaces. Examine walls, ceilings, and mounting areas for structural integrity, smoothness, and load bearing capacity. Clean surfaces thoroughly to remove dust, grease, and debris that might interfere with adhesive mounting or fixture placement. Check electrical outlets and junction boxes to confirm they can support the power requirements of your wireless lighting system. Verify circuit ratings, ensure proper grounding, and confirm that existing electrical infrastructure can handle the additional load without risking overload or potential electrical hazards.
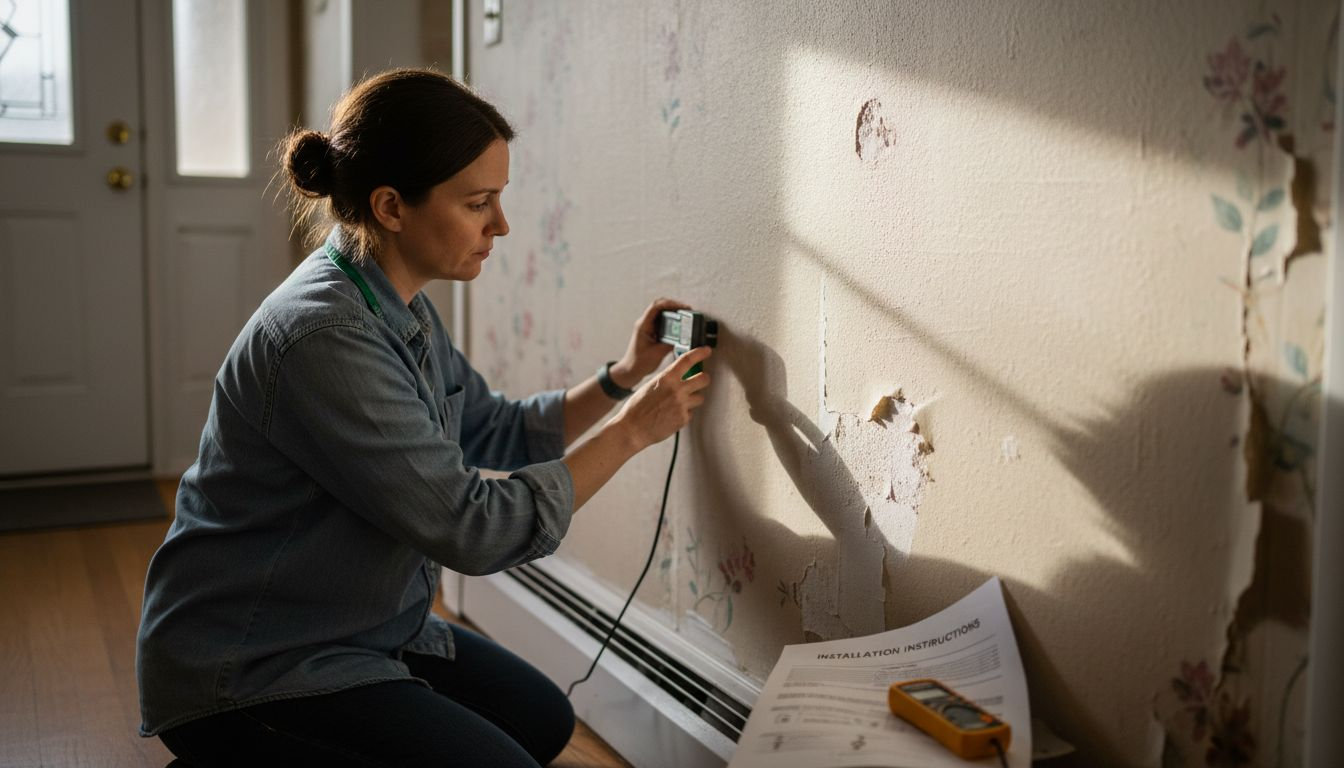
For wireless lighting installations, carefully evaluate installation conditions that impact signal transmission and operational reliability. Assess potential wireless communication interference from thick walls, metal structures, or electronic devices. Identify clear line-of-sight paths for wireless signals and consider potential signal repeaters or mesh network solutions if your space presents communication challenges. Measure and mark precise mounting locations, ensuring level placement and adequate spacing between fixtures to optimize both aesthetic appeal and functional illumination.
Pro tip: Use a digital stud finder and voltage detector to accurately locate safe mounting points and verify electrical conditions before beginning your wireless lighting installation.
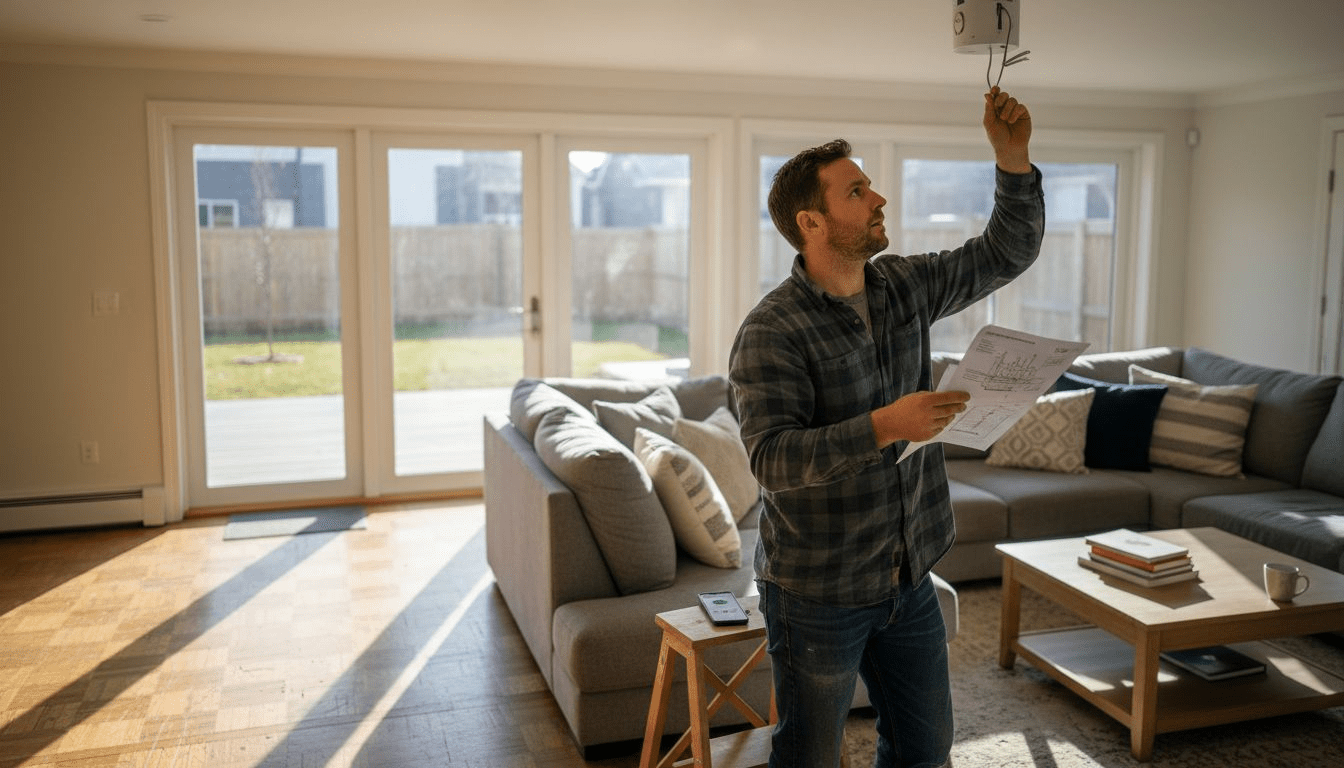
Successful wireless lighting installation requires precision, careful technique, and understanding of both mechanical mounting and wireless communication principles. Wireless lighting installation demands manufacturer guidelines to ensure reliable performance and long-term functionality.
Begin by carefully reviewing the specific mounting hardware provided with your wireless lighting fixtures. Select appropriate mounting tools matching your surface material including anchors for drywall, masonry screws for concrete, or specialized clips for drop ceilings. Ensure each fixture receives secure attachment with minimal movement or potential for future displacement. Pay close attention to weight distribution and load bearing capacity, verifying that your mounting points can safely support the fixture without risk of detachment.
Prioritize wireless signal optimization during installation by strategically positioning wireless lighting fixtures to maximize communication reliability. Avoid mounting locations with significant wireless interference such as near metal structures, dense walls, or high electromagnetic activity zones. Test wireless connectivity immediately after mounting by activating pairing modes and confirming strong signal strength between fixtures and your central smart home hub. Implement cable management techniques to maintain clean installation aesthetics while preventing potential signal disruption or physical strain on wireless connections.
Pro tip: Use a wireless signal strength meter during installation to identify optimal fixture placement and ensure consistent communication performance across your smart lighting network.
Configuring your wireless lighting system transforms smart hardware into a personalized, intelligent network that adapts to your lifestyle. Open lighting architecture supports multiple configuration protocols to ensure seamless integration and customization of your smart home environment.
Begin by accessing your wireless lighting system’s mobile app or control interface. Systematically test each fixture by activating individual and group controls, verifying that every light responds correctly to commands. Create multiple lighting scenes that match different activities such as reading, entertaining, or relaxing, adjusting brightness levels, color temperatures, and transition speeds to match your preferences. Pay close attention to sensor interactions, testing occupancy detection, daylight harvesting features, and scheduling capabilities to confirm that automated behaviors work precisely as intended.
Lighting control configuration involves nuanced parameter settings that can dramatically enhance both comfort and energy efficiency. Experiment with dimming curves, motion sensor timeouts, and automated scheduling to create a responsive lighting environment. Validate communication between different smart home devices, ensuring your lighting system can interact seamlessly with voice assistants, security systems, or other home automation platforms. Document any custom settings or unique configurations for future reference and potential system expansions.
Pro tip: Create a spreadsheet tracking your custom lighting scenes and automation rules to simplify future troubleshooting and system modifications.
Final system verification transforms your wireless lighting installation from a collection of hardware into an intelligent, energy-efficient ecosystem. Smart home energy optimization requires systematic testing to ensure every component operates precisely as designed while minimizing electricity consumption.
Begin by conducting a comprehensive functionality audit of your wireless lighting system. Systematically test each fixture and automation rule by triggering scenarios that simulate real world usage. Verify motion sensors activate lights at appropriate times, confirm scheduled scenes transition smoothly, and check that daylight harvesting features adjust illumination levels accurately. Pay special attention to backup power modes, wireless communication reliability, and the responsiveness of individual and grouped lighting controls.
Networked lighting controls enable advanced energy management through sophisticated scheduling and sensor-based adjustments. Review system logs to identify potential inefficiencies and fine-tune automation parameters. Adjust occupancy sensor timeouts, dimming curves, and light level thresholds to create a balance between comfort and energy conservation. Monitor your system’s performance over several weeks, making incremental optimizations that gradually reduce energy consumption without compromising lighting quality or user experience.
Pro tip: Use your smart lighting system’s energy monitoring dashboard to track real-time and historical electricity usage, helping you identify and eliminate unnecessary lighting consumption.
Below is a summary of key steps for optimizing wireless lighting installation and energy management:
| Step | Main Objective | Optimization Focus |
|---|---|---|
| Surface & Power Preparation | Ensure safe, reliable installation | Test surfaces, confirm wiring |
| Secure Fixture Installation | Maintain performance, aesthetics | Avoid interference, balance loads |
| Automation Configuration | Achieve responsive smart lighting | Tune sensors, set schedules |
| Energy Optimization | Reduce consumption, improve comfort | Adjust dimming, monitor use |
Installing wireless lighting systems can feel overwhelming when you consider technical challenges like secure fixture placement, signal reliability, and seamless automation setup. If you want to enhance your home lighting without complicated wiring or professional help, finding reliable and energy-efficient products is essential. This article highlights the critical steps for a smooth installation while maximizing comfort and energy savings through smart automation.
Discover how to transform your living spaces with our Smart Motion Sensor Lights Collection designed for effortless installation and excellent wireless performance.
Experience hassle-free upgrade with wireless lights that include daylight detection and adjustable tones, perfect for hallways, kitchens, and stairs. Visit Try Illuminate now to explore innovative lighting options that bring safety, convenience, and energy savings to your home. Don’t wait to create smart lighting scenes tailored to your lifestyle with products featured in our Best Sellers. Step into the future of home automation today.
Begin by evaluating each room for size, natural light, and specific lighting tasks like reading or cooking. Walk through your home, noting areas that need task, accent, or safety lighting to create an effective lighting plan.
Choose products that are compatible with your existing smart home system and support multiple communication protocols. Prioritize items based on their energy efficiency features, installation ease, and specific room requirements to ensure effective lighting integration.
Clean and assess the mounting surfaces for structural integrity, ensuring they can support your new fixtures. Check electrical outlets and outlets for compatibility, making any necessary adjustments to accommodate your wireless lighting system.
Carefully review the mounting hardware provided and select the right tools for your specific surfaces. Ensure fixtures are securely attached and positioned to avoid wireless signal interference, optimizing performance and aesthetic appeal.
Access your lighting system’s mobile app to create and test personalized lighting scenes that fit your lifestyle. Adjust settings like brightness and color temperature for different activities, validating that each fixture responds as intended to enhance convenience and comfort.
Conduct a thorough audit of your wireless lighting system by testing each fixture and automation rule while monitoring energy consumption. Adjust parameters such as occupancy sensor timeouts and dimming levels to reduce electricity usage without sacrificing illumination quality.

Why Choose Motion Sensor Lights for Your Home
Discover why motion sensor lights are ideal for energy efficiency, hassle-free safety, and smart home convenience. Compare types, features, and costs.
Read more
How to Set Up Wireless Lights for Smart Home Convenience
Discover how to set up wireless lights step by step for a smarter, safer home. Learn installation, customization, and quality checks for easy lighting upgrades.
Read more