
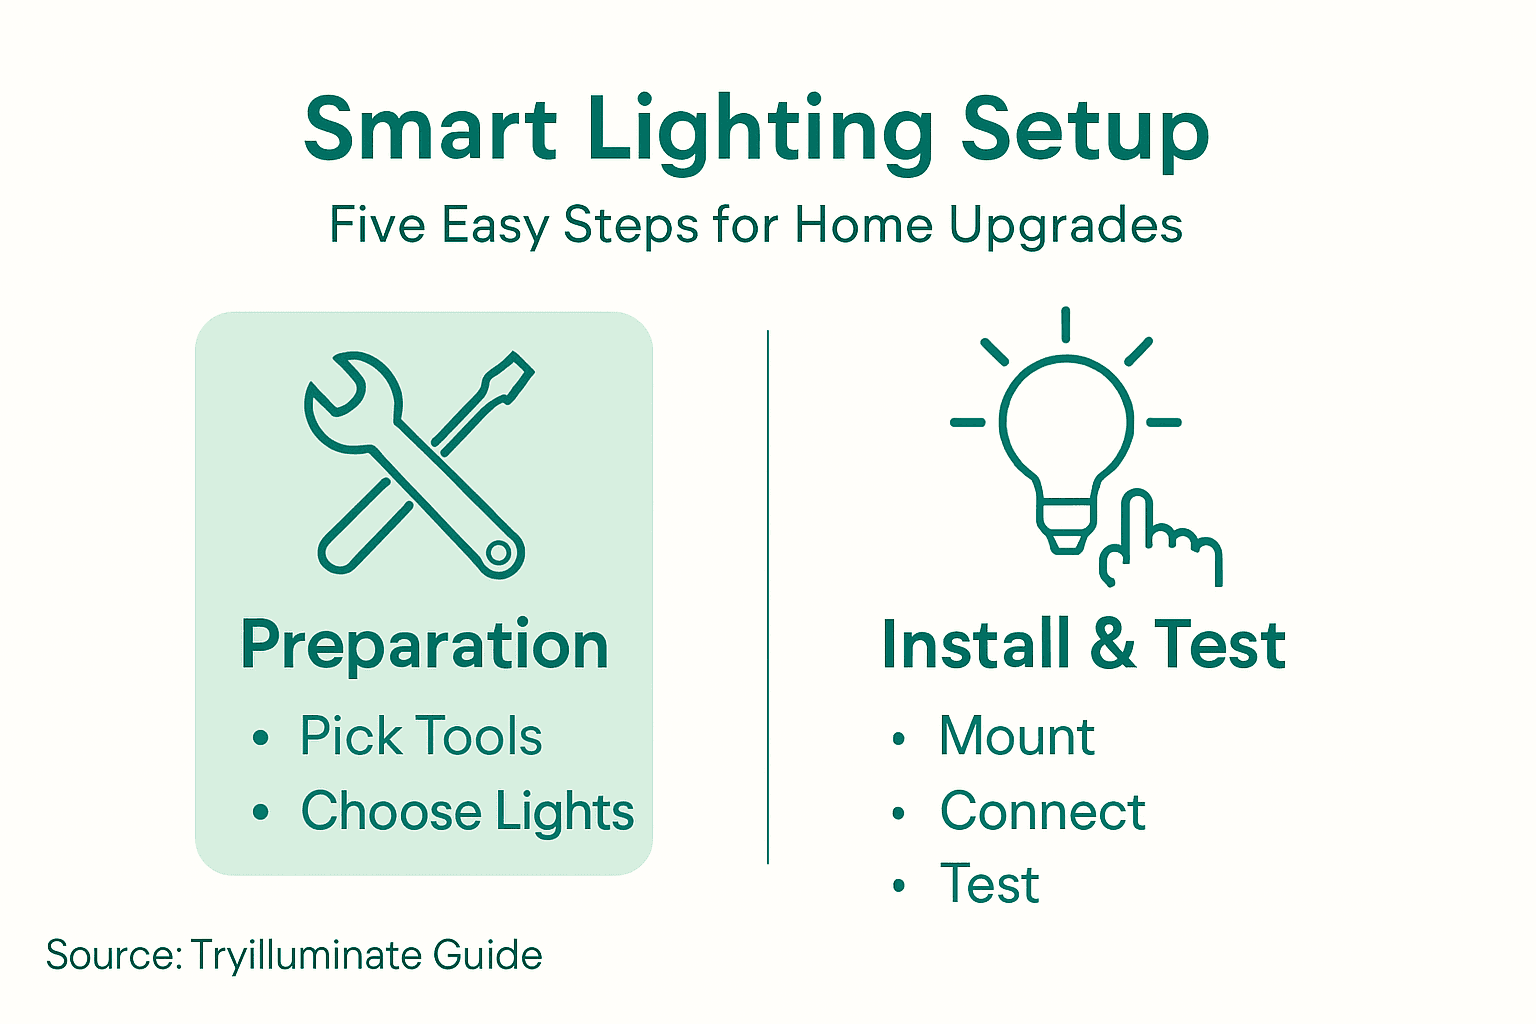
Installing smart lighting does not have to mean opening walls or wrestling with complex wiring. For today’s tech-savvy homeowner, a few simple tools and the right components can make energy-efficient lighting upgrades feel practically effortless. Choosing the correct installation steps and placing each fixture based on room needs means you can quickly transform any space for better comfort, convenience, and modern style while avoiding electrical hassles altogether.
| Key Point | Explanation |
|---|---|
| 1. Gather Necessary Tools | Collect essential tools like screwdrivers, wire strippers, and voltage testers for a smooth smart lighting installation. |
| 2. Choose Optimal Installation Locations | Place smart lighting in rooms based on their function to enhance both beauty and usability throughout your home. |
| 3. Follow Safe Installation Practices | Always turn off power at the circuit breaker and ensure correct wiring connections to avoid electrical issues during installation. |
| 4. Configure Devices Using Companion Apps | Use manufacturer apps to set up devices, create schedules, and integrate with voice assistants to maximize smart lighting functionality. |
| 5. Test System for Performance and Safety | Conduct comprehensive tests on connectivity, control, and automation features to confirm all parts function correctly before full use. |
Before diving into your smart home lighting upgrade, you’ll need to collect the right equipment and tools for a smooth installation. Smart lighting systems require specific components that will transform your home’s illumination with minimal effort.
Start by assembling your essential installation toolkit, which typically includes:
For your smart lighting components, gather the specific devices you’ll be installing. This might include smart bulbs, LED light strips, motion sensors, or wireless switches. Check compatibility with your home’s existing wireless network - most smart lighting systems operate over Wi-Fi or Zigbee protocols.
Ensure all wireless devices communicate on the same protocol to prevent connectivity issues.
Depending on your specific setup, you might also need a smart hub that connects and coordinates your lighting devices. Some systems work directly through smartphone apps, while others require a central hub for full functionality.
Here’s a quick comparison of common smart lighting devices and their typical uses:
| Device Type | Best Use Location | Key Benefit |
|---|---|---|
| Smart Bulb | Living room, bedroom | Flexible colors and dimming |
| LED Light Strip | Kitchen, hallways | Customizable ambient light |
| Motion Sensor | Entrances, hallways | Automated activation |
| Wireless Switch | Shared spaces | Convenient remote control |
| Smart Hub | Central area | Connects many devices |
Pro tip: Always purchase slightly more mounting hardware and adhesive strips than you think you’ll need, as backup options can save you time during installation.
Selecting the right locations for your smart lighting installation can dramatically enhance both functionality and aesthetic appeal in your home. Smart home lighting placement requires strategic thinking beyond simply mounting fixtures.
Consider these key areas for optimal smart lighting installation:
Assess room functionality carefully when choosing installation spots. Different rooms demand unique lighting approaches - what works in a home office might feel intrusive in a bedroom. For instance, bright fixed lights suit workspaces, while bedrooms benefit from dimmable or color-changing options that create a relaxing atmosphere.
Smart lighting allows you to transform each space’s ambiance with precision and ease.
Connectivity is another crucial factor. Position your smart lights within reasonable proximity to your smart home hub to ensure reliable wireless communication. Consider potential interference from walls, electronic devices, and other wireless signals that might disrupt your lighting network.

Pro tip: Create a quick digital sketch or floor plan of your home to map out ideal smart lighting locations before purchasing or installing any fixtures.
With your locations selected, it’s time to transform your space by installing smart lighting fixtures. Smart light installation techniques range from incredibly simple to moderately complex, depending on your chosen devices.
Your mounting approach will vary based on the specific type of smart lighting:
Prepare your workspace by ensuring the power is completely turned off at the circuit breaker. Remove existing fixtures carefully, keeping track of all screws and mounting hardware. For most smart bulbs and simple fixtures, you’ll simply unscrew the old component and replace it with the new smart version.
Safety first: Always confirm electrical power is off before beginning any installation.
For more complex fixtures requiring electrical connections, match the wire colors carefully - typically black to black (hot), white to white (neutral), and green or bare copper to ground. Use wire nuts to secure connections, ensuring a tight and secure fit.
Pro tip: Take a smartphone photo of the original wiring configuration before disconnecting anything, which can serve as a helpful reference during reinstallation.
With your smart lighting fixtures physically installed, the next crucial step is bringing them to life through digital configuration. Smart lighting setup transforms your new fixtures from simple hardware into intelligent, responsive home technology.
Follow these key steps to connect and customize your smart lighting:
Activate pairing mode by following the specific instructions for your device. This typically involves a unique power cycling sequence - usually turning the light on and off in a specific pattern or pressing a dedicated sync button. Most smart bulbs will flash or change color to indicate they’re ready to connect.
Patience is key during the initial setup process - each device may have slightly different connection requirements.
Once connected, explore your app’s advanced features like grouping lights, setting color temperatures, creating automated schedules, and integrating with voice assistants such as Alexa or Google Assistant. These features allow you to control your entire lighting system with just your voice or through preset automated routines.
Pro tip: Keep your smartphone and home Wi-Fi password nearby during setup to streamline the connection process and avoid unnecessary frustration.
With your smart lighting system installed and configured, comprehensive testing ensures optimal functionality and safety. Smart lighting system testing goes beyond simple illumination to verify reliability and performance.
Conduct these essential testing procedures:
Power cycle each smart fixture methodically, ensuring they respond correctly to app commands and maintain consistent performance. This includes testing remote control functions, color changing capabilities, and dimming mechanisms across different rooms and environments.
A systematic approach prevents potential malfunctions and guarantees smooth home automation.
Pay special attention to integration points between your smart lighting system and other home automation devices. Verify that motion sensors trigger lights appropriately, scheduled routines execute correctly, and voice commands produce the expected lighting responses.
To help ensure thorough testing, review this summary of smart lighting system checks:
| Test Step | Purpose | When to Perform |
|---|---|---|
| Wireless connectivity | Verify reliable connections | After installation |
| Individual control | Ensure each light works properly | After device setup |
| Color/brightness adjust | Confirm custom settings enabled | Both day and night |
| Automation/scheduling | Test routines and triggers | After app configuration |
| Voice assistant commands | Confirm smart assistant links | At end of setup |
Pro tip: Create a comprehensive testing checklist and document any irregularities during your initial system evaluation to address potential issues quickly.
If you found the “Easy Lighting Installation Process for Smart Home Upgrades” helpful, you understand the importance of simple, safe, and effective smart lighting installation. Many homeowners struggle with choosing the right fixtures and the hassle of complex wiring. At TryIlluminate.co, we offer a range of wireless and rechargeable smart lighting options designed exactly to solve these challenges for you. Our collection of Smart Motion Sensor Lights Collection provides convenient, energy-efficient solutions perfect for hallways, kitchens, and other high-traffic areas that benefit from automated lighting.
Experience the true ease of upgrading your home instantly with no wiring expertise needed. Visit TryIlluminate.co now and explore our Best Sellers to find your next hassle-free lighting upgrade. Act today to enjoy safer, smarter, and more beautiful home lighting settings that fit your lifestyle perfectly.
To install smart lighting, gather tools such as a screwdriver set, wire strippers, and a voltage tester. Ensure you have the necessary mounting hardware and any specific devices you’ll be installing, like smart bulbs or LED light strips.
Select installation locations based on functionality and aesthetics, focusing on areas such as living rooms for ambiance and kitchens for task lighting. Create a sketch of your home to plan ideal placements before purchasing any fixtures.
To install smart light fixtures, start by turning off power, then replace existing bulbs or mount new devices following the manufacturer’s instructions. Use wire nuts for secure connections when necessary and ensure everything is tightly secured for optimal performance.
After installation, download the manufacturer’s app and create a user account to connect your lights. Follow the app instructions to enable pairing mode and connect your devices to your home Wi-Fi network.
To test your smart lighting setup, verify wireless connectivity and check individual light controls and automated schedules. Power cycle each fixture and ensure that they respond correctly through the app and any voice assistant integration.
If your smart lights do not connect, make sure they are within range of the smart hub and check for interference from other devices. Restart both the lights and your router, then attempt the connection process again.
Why Smart Lighting Matters for Homeowners
Smart lighting for homeowners brings energy savings, easy DIY installation, enhanced safety, and modern convenience. Learn about systems, features, and costs.
Read more
DIY Smart Lighting Guide to Easy Home Automation Success
Unlock home automation with this diy smart lighting guide. Follow easy, step-by-step actions to upgrade, automate, and optimize your home's lighting with smart solutions.
Read more